Difference between revisions of "NetApp Volume"
(→Naming Volumes) |
(→Adjusting settings) |
||
| (19 intermediate revisions by one user not shown) | |||
| Line 1: | Line 1: | ||
== What are Volumes? == | == What are Volumes? == | ||
| − | The best way to think of a NetApp volume is to imagine a folder in Windows. All of the disk/RAID configuration is already taken care of | + | The best way to think of a NetApp volume is to imagine a folder in Windows. All of the disk/RAID configuration is already taken care of at the aggregate level, and you're ready to start laying down some data. |
| − | If you mess up volume thin-provisioning, you can take an entire aggregate down with you. If you mess up thin-provisioning inside of a volume, then only that volume is affected. | + | Rather than just throwing files around all over the place, you use Volumes (like folders) to sort your data. The big difference between a traditional folder and a volume is that a volume has a set size. Imagine if you went into a folder's properties and set its size to "50 GB", that's what a volume is like. Not only do we say that the volume can't be over 50 GB, we actually fix its size at 50 GB, so it consumes 50 GB of space even when its empty. When you start talking about enterprise storage, you realize that you are able to thin-provision just about everything if you wanted to. '''NEVER THIN-PROVISION VOLUMES'''. Volumes should always be set to '''RESERVE''' their full space upon creation. This way, when you look at your space available on the aggregate, you know that is your true space available. |
| + | |||
| + | If you mess up volume thin-provisioning, you can take an '''entire aggregate''' down with you. If you mess up thin-provisioning inside of a volume, then only that volume is affected. Speaking as a guy who has taken down plenty of volumes, don't mess this up. | ||
== Naming Volumes == | == Naming Volumes == | ||
Volume naming is something very dear to my heart. Please, standardize your volume names and realize that we will be using these volume names in conversation, so make them readable. Here are some CIO standards: | Volume naming is something very dear to my heart. Please, standardize your volume names and realize that we will be using these volume names in conversation, so make them readable. Here are some CIO standards: | ||
| + | |||
| + | If you're just doing a normal volume, just call it something short and simple. There's no need to get fancy or to introduce extra acronyms for no reason. Seriously. | ||
For SQL or Exchange, you need 2-3 volumes. Use the volume name suffixed by SQL, Logs, or SnapInfo. If you're talking about Exchange or a non-SQL app, suffix the first volume with DB. For example: | For SQL or Exchange, you need 2-3 volumes. Use the volume name suffixed by SQL, Logs, or SnapInfo. If you're talking about Exchange or a non-SQL app, suffix the first volume with DB. For example: | ||
| − | PandoraSQL, PandoraLogs, PandoraSnapInfo | + | * ''PandoraSQL, PandoraLogs, PandoraSnapInfo'' |
| − | ExchDB, ExchLogs | + | |
| + | * ''ExchDB, ExchLogs'' | ||
| + | |||
For SnapVaulted volumes, you add sv_ to the original volume's name. Example: | For SnapVaulted volumes, you add sv_ to the original volume's name. Example: | ||
| − | sv_PandoraSQL | + | * ''sv_PandoraSQL'' |
| + | |||
| + | |||
| + | == Making a volume == | ||
| + | |||
| + | NetApp is transitioning into using System Manager for all management purposes, so we should start to use it for everything as well. Data ONTAP 8.1 doesn't even ship with FilerView at all. Here's a walkthrough of making a new volume in System Manager. Go to Storage, then Volumes, and hit Add Volume. Here's the window you're presented with: | ||
[[File:Volumenaming.jpg]] | [[File:Volumenaming.jpg]] | ||
| + | |||
| + | * We already went over naming, you have that part handled. | ||
| + | |||
| + | * You obviously want to pick the right aggregate, but for all non-CHS customers, this will always be aggr0. | ||
| + | |||
| + | * For Storage Type, the only thing that changes is whether it's exported by default or not. THIS CHOICE DOESN'T REALLY MATTER. | ||
| + | |||
| + | * Set your total size appropriately, but know you can move it up and down at will without any issues. | ||
| + | |||
| + | * Snapshot Reserves will be covered in a later chapter, but '''ALWAYS SET THIS TO 0%'''. | ||
| + | |||
| + | * Obviously turn off Thin Provisioning. | ||
| + | |||
| + | |||
| + | Let's move to the second tab: | ||
| + | |||
| + | [[File:Dedupesettings.jpg]] | ||
| + | |||
| + | * We'll turn on deduplication, obviously it's a good thing and should be turned on just about everywhere. | ||
| + | |||
| + | * Compression is only used in very specific scenarios, '''ALWAYS LEAVE THIS OFF'''. | ||
| + | |||
| + | |||
| + | == Adjusting settings == | ||
| + | |||
| + | Now that we've successfully created the volume, let's finish the setup. You configure snapshots by selecting your volume, then going to the Snapshot Copies menu and hitting Configure. | ||
| + | |||
| + | [[File:Snapsettings.jpg]] | ||
| + | |||
| + | Here's where you can make your snapshot directory visible (almost always good), enable scheduled snapshots, and configure when they're taken. If you're working with a volume that will be snapshotted by SnapManager for whatever, TURN OFF SCHEDULED SNAPSHOTS. | ||
| + | |||
| + | |||
| + | The final settings are found in the Edit Volume menu, which you get to by selecting the volume and pushing Edit. | ||
| + | |||
| + | [[File:Configdedupe.jpg]] | ||
| + | |||
| + | Scheduled your dedupe jobs to happen before your snapshots happen. As an example, run dedupe at 10pm and then run your backups at midnight. The only exceptions to this rule are snapvault volumes, which are set to manual, since they automatically dedupe themselves. Automatic is always a bad idea. | ||
| + | |||
| + | |||
| + | [[File:advvolume.jpg]] | ||
| + | |||
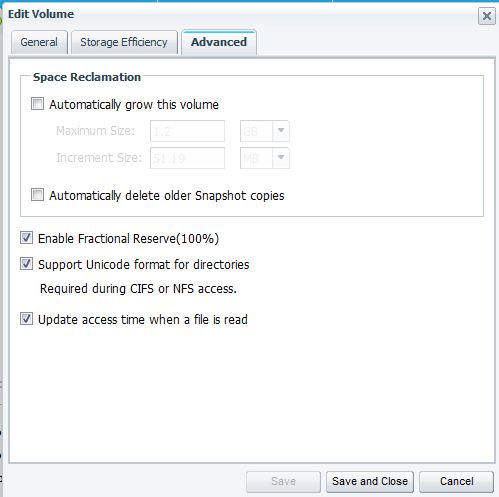
| + | You can set up Autogrow, which will grow the volume automatically if it fills up. Only use this for emergencies or very critical volumes. You can also set up Auto-delete to delete older snapshots when it fills up, which is usually the better choice for making sure you have free space. Finally, Fractional Reserve needs to be on for every volume, no exceptions. Unless the volume is constantly managed by an expert, turning Fractional Reserve off is asking for serious trouble. | ||
Latest revision as of 00:58, 30 October 2011
What are Volumes?
The best way to think of a NetApp volume is to imagine a folder in Windows. All of the disk/RAID configuration is already taken care of at the aggregate level, and you're ready to start laying down some data.
Rather than just throwing files around all over the place, you use Volumes (like folders) to sort your data. The big difference between a traditional folder and a volume is that a volume has a set size. Imagine if you went into a folder's properties and set its size to "50 GB", that's what a volume is like. Not only do we say that the volume can't be over 50 GB, we actually fix its size at 50 GB, so it consumes 50 GB of space even when its empty. When you start talking about enterprise storage, you realize that you are able to thin-provision just about everything if you wanted to. NEVER THIN-PROVISION VOLUMES. Volumes should always be set to RESERVE their full space upon creation. This way, when you look at your space available on the aggregate, you know that is your true space available.
If you mess up volume thin-provisioning, you can take an entire aggregate down with you. If you mess up thin-provisioning inside of a volume, then only that volume is affected. Speaking as a guy who has taken down plenty of volumes, don't mess this up.
Naming Volumes
Volume naming is something very dear to my heart. Please, standardize your volume names and realize that we will be using these volume names in conversation, so make them readable. Here are some CIO standards:
If you're just doing a normal volume, just call it something short and simple. There's no need to get fancy or to introduce extra acronyms for no reason. Seriously.
For SQL or Exchange, you need 2-3 volumes. Use the volume name suffixed by SQL, Logs, or SnapInfo. If you're talking about Exchange or a non-SQL app, suffix the first volume with DB. For example:
- PandoraSQL, PandoraLogs, PandoraSnapInfo
- ExchDB, ExchLogs
For SnapVaulted volumes, you add sv_ to the original volume's name. Example:
- sv_PandoraSQL
Making a volume
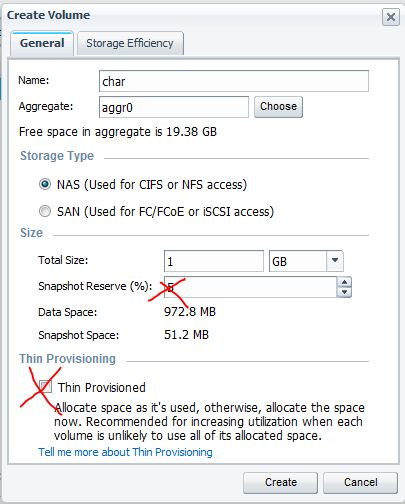
NetApp is transitioning into using System Manager for all management purposes, so we should start to use it for everything as well. Data ONTAP 8.1 doesn't even ship with FilerView at all. Here's a walkthrough of making a new volume in System Manager. Go to Storage, then Volumes, and hit Add Volume. Here's the window you're presented with:
- We already went over naming, you have that part handled.
- You obviously want to pick the right aggregate, but for all non-CHS customers, this will always be aggr0.
- For Storage Type, the only thing that changes is whether it's exported by default or not. THIS CHOICE DOESN'T REALLY MATTER.
- Set your total size appropriately, but know you can move it up and down at will without any issues.
- Snapshot Reserves will be covered in a later chapter, but ALWAYS SET THIS TO 0%.
- Obviously turn off Thin Provisioning.
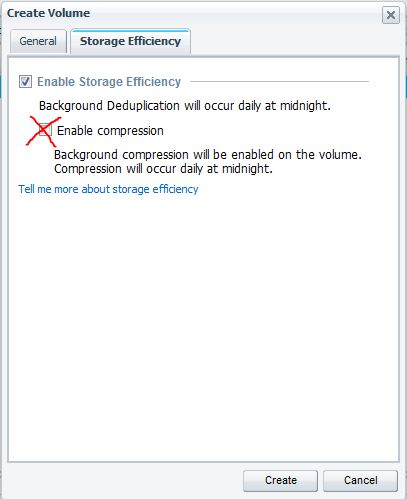
Let's move to the second tab:
- We'll turn on deduplication, obviously it's a good thing and should be turned on just about everywhere.
- Compression is only used in very specific scenarios, ALWAYS LEAVE THIS OFF.
Adjusting settings
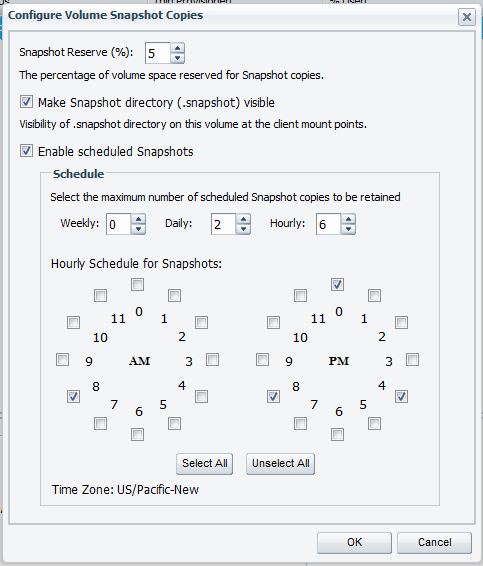
Now that we've successfully created the volume, let's finish the setup. You configure snapshots by selecting your volume, then going to the Snapshot Copies menu and hitting Configure.
Here's where you can make your snapshot directory visible (almost always good), enable scheduled snapshots, and configure when they're taken. If you're working with a volume that will be snapshotted by SnapManager for whatever, TURN OFF SCHEDULED SNAPSHOTS.
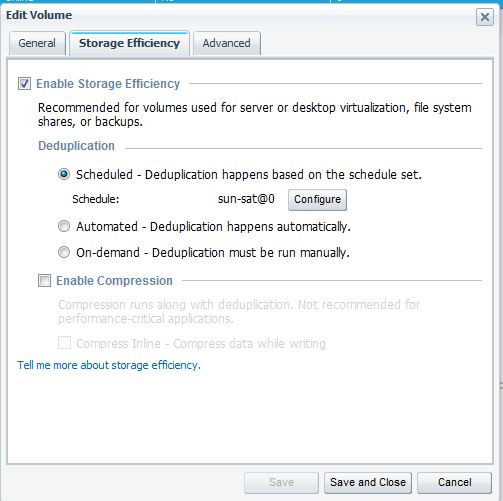
The final settings are found in the Edit Volume menu, which you get to by selecting the volume and pushing Edit.
Scheduled your dedupe jobs to happen before your snapshots happen. As an example, run dedupe at 10pm and then run your backups at midnight. The only exceptions to this rule are snapvault volumes, which are set to manual, since they automatically dedupe themselves. Automatic is always a bad idea.
You can set up Autogrow, which will grow the volume automatically if it fills up. Only use this for emergencies or very critical volumes. You can also set up Auto-delete to delete older snapshots when it fills up, which is usually the better choice for making sure you have free space. Finally, Fractional Reserve needs to be on for every volume, no exceptions. Unless the volume is constantly managed by an expert, turning Fractional Reserve off is asking for serious trouble.
